Something you might have observed in both the Perspective and ColoredCubes
examples is that the objects nearer the camera all appear in front of
the objects farther away. When we displayed our graphics using sprites,
we had to put in some effort to provide a LayerDepth
value for each sprite in order to facilitate depth sorting like this.
There is no equivalent functionality in these 3D projects, though, and
yet the objects still all appear in the right places. Why does this
happen?
The answer is that XNA has a
built-in mechanism for ensuring that objects in the front of the scene
automatically hide any objects that fall behind them. This happens
regardless of the order in which objects are drawn: objects drawn behind
existing objects can still be partially (or totally) obscured even
though they might be rendered after the object in front.
XNA achieves this effect by using a feature known as the depth buffer.
It can be enabled or disabled, and is enabled by default. When
rendering simple 2D graphics, the depth buffer might be unnecessary, but
in 3D scenes it is almost certain to be required.
Just as the color of
each rendered pixel is written into a graphical buffer for display on
the screen, so the distance into the screen of each rendered pixel is
written into a corresponding depth buffer when the buffer is enabled.
For each individual pixel that it is about to render, XNA checks the
depth of the pixel against the depth already stored in the buffer. If it
finds that the new pixel is farther away than the pixel already in the
buffer, the new pixel is not rendered to the screen; otherwise, the
pixel is rendered and the depth buffer updated to remember the new depth
of the pixel.
This per-pixel depth checking can be clearly seen in the DepthBuffer example project, shown in Figure 1.
This figure displays two rotating cubes, positioned so that they
intersect one another; and below them a third cube, squashed to form a
"floor." Observe the behavior when the cubes intersect one another: at
every single pixel position, the frontmost cube surface is always
displayed.

The way that intersecting
objects are handled can be very useful. For example, if you want to draw
a landscape scene with water such as lakes or an ocean, the ground can
be drawn in its entirety (the parts that are above the water level and
also those that are below) and then a single semitransparent flat plane
can be drawn at the water level across the entire scene. Only those
parts of the scene that are below the water level will be affected by
the water plane, providing a reasonably convincing approximation of
water with very little complexity or processor cost.
1. Enabling and Disabling the Depth Buffer
Most of the time when you are
rendering objects in your game, you will want the depth buffer to be
available and active. Without it, distant objects will appear in front
of nearer objects, destroying the illusion of the 3D world that you are
trying to render.
On some occasions, however,
you might want to render without updating the depth buffer. Examples
include rendering background scenery that should never obscure any of
the other graphics rendered and objects that are rendered in front of a
scene to provide overlay content such as status bars or health displays.
The depth buffer can be temporarily disabled by setting the GraphicsDevice.DepthStencilState property to DepthStencilState.None.
After this property has been set, graphics that are rendered will
entirely ignore the depth buffer, neither observing values that are
stored in it nor updating the values when new objects are rendered. To
restore the normal behavior of the depth buffer, set the property back
to its default value: DepthStencilState.Default.
You can see the effect of disabling the depth buffer by inserting the code from Listing 1 at the end of the LoadContent function in the Perspective example project.
Example 1. Disabling the depth buffer
// Disable the depth buffer
        GraphicsDevice.DepthStencilState = DepthStencilState.None;
|
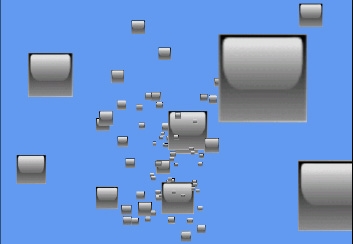
Once the depth buffer has been
disabled, you will find that the objects appear in the order that they
are rendered rather than being sorted by their depth. This can be seen
in Figure 2, in which some of the smaller, more distant shapes are clearly being displayed in front of the larger closer objects.
NOTE
If you want to entirely disable the depth buffer, you can set the _graphics.PreferredDepthStencilFormat property to DepthFormat.None
in your game class constructor. This setting will initialize the
graphics device without creating a depth buffer, which can save you some
memory and processing overhead if you have no need for it.
There is another mode that can
be set for the depth buffer: read-only mode. In this mode, XNA will
observe the values in the depth buffer when rendering objects and will
use it to prevent objects from being drawn if they are behind existing
objects, but the depth buffer will not be updated in response to
rendered objects.
This mode might seem like an unlikely feature to need, but it has various uses. One such use is for drawing particles
in a 3D scene. Although it is important that these correctly appear behind
objects in the scene, we need to ensure that they don't obscure one
another or else they won't display correctly.
XNA can be set to use a read-only depth buffer by setting the GraphicsDevice.DepthStencilState property to DepthStencilState.DepthRead. Don't forget to set it back to DepthStencilState.Default once you are finished with this mode.
2. Clearing the Depth Buffer
In some situations you might
want to clear the values stored in the depth buffer. This might be the
case if you are drawing two scenes, one in front of the other, and want
to prevent each one from interfering with the other. The first scene can
be drawn (with the depth buffer active and working), the depth buffer
then cleared, and the second scene then drawn. The depth data from the
first scene will not interfere with the second scene at all.
To clear the depth buffer, we can call the GraphicsDevice.Clear method, just as we do at the start of the game's Draw
function, but instead of simply passing a color we pass some additional
parameters that tell it to clear only the depth buffer, not the
graphics that have been rendered. The code for clearing the depth buffer
can be seen in Listing 2.
Example 2. Clearing the depth buffer
GraphicsDevice.Clear(ClearOptions.DepthBuffer, Color.White, 1, 0);
|
Because the Clear method's first parameter is set to ClearOptions.DepthBuffer,
only the depth buffer will be affected. We still have to pass a color
(which will be ignored) and a stencil value (which we are not using),
but the value 1 passed for the depth buffer tells XNA to set the buffer
so that the depths are all considered as being at the very back of the
viewing frustum. Subsequently drawn objects will therefore appear in
front of this far depth and will not be obscured by previously drawn
objects.
3. Rendering Transparent Objects with the Depth Buffer
The depth buffer might not
work exactly as you expect when it comes to drawing semitransparent
objects. Although XNA's alpha blending feature can merge together
objects that are being drawn with those already on the screen, the depth
buffer can store only a single depth for each pixel. This means that,
if you draw a semitransparent object and then draw an object behind it,
the object behind will be completely eliminated by the depth buffer,
even though the first object was transparent.
There are several
approaches that can be employed to handle this. The first is to draw all
your transparent objects so that those in the back of your scene are
rendered first. This will ensure that objects in the front do not
obscure those behind.
The second approach is to draw all your opaque objects first and then switch the depth buffer into DepthRead
mode before drawing the transparent objects. This way the transparent
objects will not obscure anything subsequently drawn behind them.
The final option is to use the AlphaTest effect (instead of the BasicEffect
that we have been using so far), which can update the depth buffer only
for pixels that match certain conditions in terms of their calculated
alpha values.
Exactly which of these
approaches is best will depend on what your game is drawing. Bear this
limitation in mind when creating transparent objects in 3D space.